Posts

Week 4

Main Focus for Week 4 The primary tasks for this week included: Construction of the car park. Mounting the components in the correct positions and keeping them steady. Attaching a gate to the servo motor. Building the Car Park Model This week, we found the key component materials. Black cardboard was used as the main space and floor of the parking lot, and we used a straw to serve as a gate for the small parking lot model.  To make sure the components were fixed to the black board securely, we used electrical tape and blue tack to keep the components securely fixed into place. We used white tape for lane markings and parking spaces. The board was designed to have  four separate parking spaces on one side  and two separate lanes for cars entering and leaving. Challenges & Solutions 1.  Errors caused by continuous car access. Problem:  When two cars passed through the gate quickly one after another, the sensor sometimes failed to register both and only counted...

Week 3

Image
Goals for Week 3 Complete the physical parking lot model design. Test the initial layout for potential sensor interference problems. Change and improve th e design and code to resolve cross-triggering problems. Experiment with transitioning from a   breadboard   to a   copper board  and soldering  to optimize the parking space and improve circuit connections. Initial Design Challenges We worked on refining the physical model and resolve the problems encountered during testing. While we managed to gather some materials for building the small parking lot structure, certain components like white tapes were unavailable in local stores and laboratory. This led us to rethink our construction method. We also explored  soldering  on the copper board to make the circuit more compact, stable and reduce the spaces consumed by circuit connections . To achieve this, we attempted to transfer the circuit from a  breadboard  to a  copper board  and...

Week 2

Image
Aims for week 2 The main goal for week 2 was to continue where we left off from week 1 by implementing the I2c 16x2 LCD into our smart parking-system and programming the rest of the logic into the Arduino. 1.  LCD Display Setup Integrated a 16x2 I2C LCD for real-time display of parking information. Updated the display to dynamically show the number of available parking slots.     The initial state of the LCD   The state when the car park is already full 2. Ultrasonic Sensor Integration Used two ultrasonic sensors to detect cars at the entrance and exit. Created the   MeasureDistance   function for calculating object distance. We tested the sensors by placing the toy cars at different distances from the sensors in order to determine an appropriate value for the detectionDistance variable, which is a threshold value measured in cm that the Arduino looks for so that the gate is triggered when the car is closer that the value of detectionDistance 3. Combining ...

Week 1

Image
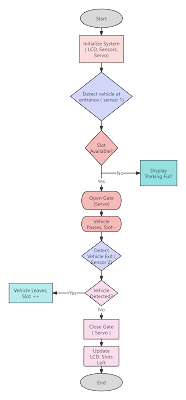
Allo cation of Roles and Analysis: In week one, our group decided on what each member's role was in the project, ensuring a smooth workflow where everyone knew what each others responsibilities were. We drafted a basic circuit architecture diagram and started had finalised the intended logic flow of the smart car-parking system. Team Members Michael Bond Yufei Fu Yujin Cao Amanah Mohammed J Abdulaal Introduction In preparation for the lab work, we designed a circuit diagram that can achieve the functions of the project. The smart car-parking system implements ultrasonic sensors to detect incoming and outgoing toy cars. One ultrasonic sensor is used to detect cars that are entering the car park, and the second sensor is used to detect cars that are leaving the car park. The system keeps track of how many spaces are available in the car park by subtracting one from the number of available spaces when a car enters the car park, and adds one to the number of available spaces when a ca...